Practical Project: The progress
This week I have been in the workshop making a start on the build of the bridge. It has turned out to be quite a slow and exploratory process of how to work with the materials. Although I have done small practice pieces using the blue Styrofoam using formers and sandpaper mostly, I found it a very different material to work with on something on a larger scale.
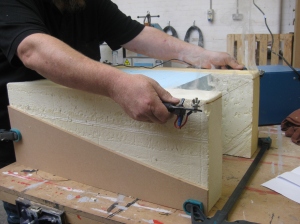
To begin with I made one stack of layers of the foam. From this I worked out how to cut diagonally through to create two equal parts both with bases of a width of 500mm and 220mm deep. To cut through the stack I used a hotwire, which involved making formers to run the length of the wire along to crate a smooth and accurate cut. You can see this in the photograph below:
The next process was experimenting with how I was going to make the rock forms. Because there is very little written information on working with Styrofoam I have collected my information from film documentaries like Sense of Scale and the extended editions of The Lord of the Rings, David Neat’s book and blog, and YouTube clips. One such YouTube video is the one below, which is a visual reference of just one persons’ method of working with the material for use in model railway landscapes:
I soon realised that it was going to be difficult with the stack already glued to carve the surface and also to follow the dimensions accurately from the technical drawing that I have done. Therefore, I had to prise the layers apart and work separately on each piece to get the basic shape of the rock face.
My peers informed me they felt I was trying to have too much control over the shapes I was creating, and this was another obstacle to overcome, the problem being that I am wary and tentative with this being my first attempt at making a model. This constructive criticism from my peers pushed me forward to then be more confident and strong with the carving, which gives a more random and organic look to the shapes.
